During my 10 months in South America, the Dog.O.Mobil had proven itself, and I now have a better understanding of its strengths and weaknesses. When planning my next trips, I decided that I would need a vehicle that could handle rough terrain better
So why do I provide this update. I wanted to show you how, in my case, a 3-month plan ended up taking 6 months to complete, and what all went wrong for me.
What You'll Find in This Post
I wrote this article in August 2026, and I'll summarize the first year of my search for a 4x4 RV
Every beginning is hard—here's why
During my 10 months in South America, the Dog.O.Mobil had proven itself, and I now had a better understanding of its strengths and weaknesses. Aside from the way I’d built the living compartment, what really stood out were its length and rear-wheel drive.
At about 750 cm and with a long limited slope angle, it’s just not the most maneuverable vehicle and tends to scrape the ground easily. The 290 cm height wasn’t really a problem, since you’re always going to get a few scratches. And to be honest, back in Germany I also found more scratches and dents on the bottom 80 cm of the Sprinter. I had them spray-painted with Raptor, and that was inexpensive. With Giuseppe’s help, I did that at home, too.
Even with the ARB compressor, the sand plates, and the BFGoodrich AT tires <which lasted about 45'000 km>, I couldn’t avoid getting the Dog.O.Mobil stuck six times. It just doesn’t like sand and mud.
I also took the Dog.O.Mobil to the shop. In addition to new tires, I had to replace the brake pads and rotors, as well as two new control arms and tie rods. I still need to check the driveshaft bearing and the oil pan. South America just comes at a price.
Since I wanted to hit the road again, I decided to get a 4x4 vehicle. If I’d only been driving around Europe, I would have stuck with the Sprinter. But I wanted to go to Africa, the Middle East, and Asia.
Let's get started
In August 2025, I began my research. I ruled out modern vehicles with AdBlue and lots of electronics. The less technology, the better! Sprinters with Iglhaut or Achleitner conversions, Ivecos with SCAM technology, and 7.5-metric-ton trucks built before 2010 were at the top of my list. I had initially set my total budget at 200'000 EUR (even though that was way too expensive for me)
Four months later, after various test drives, I still hadn’t found what I was looking for or able to afford. The prices being asked for Sprinters and Ivecos were more than I was willing to pay. If they bore the Bimobil, Bocklet, Woelcke, etc., brands, premium prices were being demanded for used models.
In the meantime, I’d toyed with the idea of a new Toyota LAND CRUISER J79D SC with a camper body from one of the well-known manufacturers, but a J79D starts at around 90 TEUR (new), and there weren’t any used ones on the market. With the camper body and modifications, the price quickly climbed to 175 TEUR and beyond. It would actually have been the perfect vehicle, but after a few inspections, I wouldn’t have been able to hit the road until late 2027.
What did I look at? There were MAN, Mercedes-Benz, and Iveco fire trucks, Varios, Unimogs, and a Renault. All had under 50,000 km on the odometer, were built before 1999, and some had “H” license plates. These included fully equipped vehicles with large cabs and lengths well over 7 m. While they had plenty of interior space, some weren’t really designed for months-long trips. Then there were vehicles that were essentially “mobile construction sites,” where I couldn’t predict whether I’d ever get them registered, and the cost was impossible for me to estimate. Many of the vehicles also had the same problem: driving them was hard, noisy work.
Before Christmas, Mercedes-Benz Atego 1018 vehicles from the German Armed Forces came onto the market. Manufactured in 2008 and 2009, with mileage between 18'000 km and 50'000 km, they were in good shape (at least the ones I’d seen).
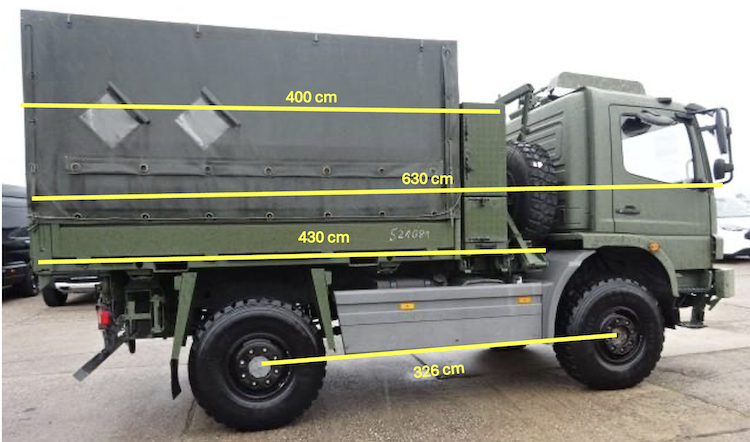
That meant a 10.5 metric tons truck I was not allowed to drive. But reducing the load to 7.5 metric tons was theoretically possible. After some research and a few setbacks, I finally found the SÄK.EL at the GEGNER car dealership near Leipzig after six months, and they even delivered it to my home—or rather, to AluStar.
Why AluStar in Murg? I had two conversion companies on my shortlist with whom I could do the conversion “together.” Doing the work myself was important to me in order to keep costs down and to be able to repair the vehicle if necessary. AluStar helped me with all sorts of clarifications in the weeks leading up to the purchase. Without that support, I wouldn’t have bought the Atego and probably wouldn’t have been able to complete the conversion either.
So much for the backstory. The SÄL.EL project kicked off on February 2, 2026 finally.
Phase 1 - He's standing in the yard
Disassembly
The Atego’s starting weight was 6'940 kg, and my target weight for a German registration was 5,995 kg (roadworthy, including an empty cabin, in my case). Together with Giuseppe, I had removed everything—or loosened the bolts on everything—that was destined for the junkyard. A few parts went to friends and acquaintances, but over the course of two days, we had prepared the roof rack, spare tire mount, storage boxes, and the flatbed.
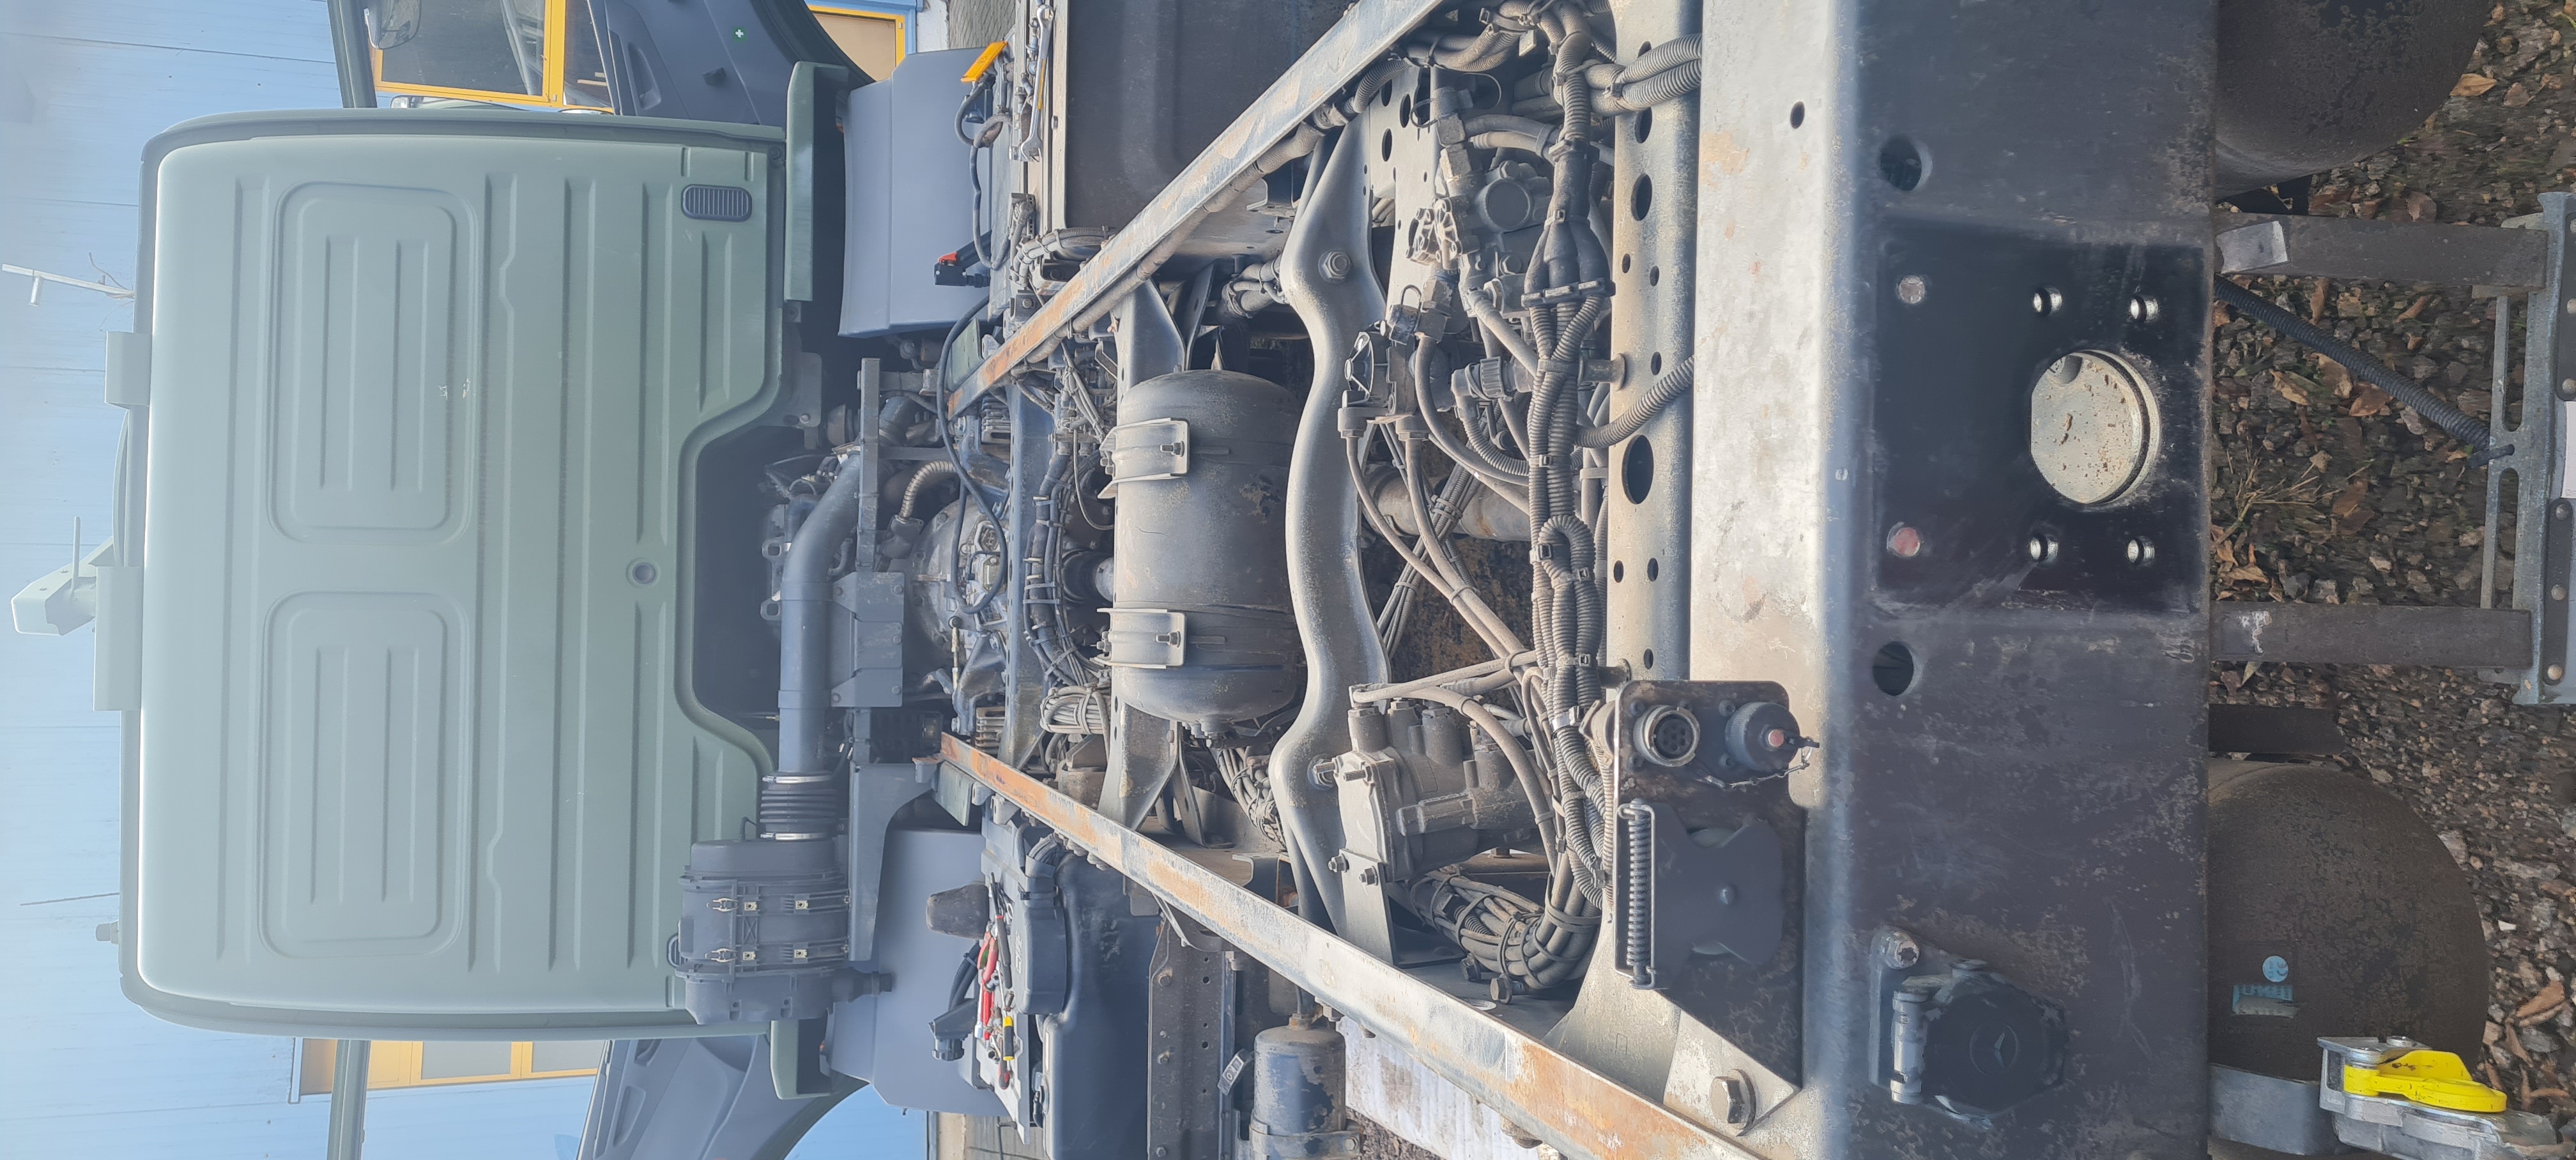
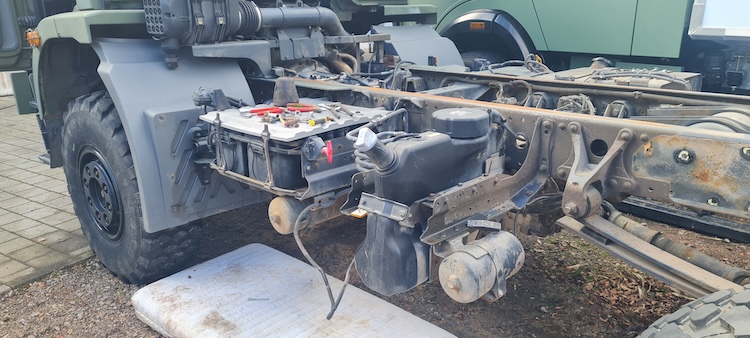
The German Army had upgraded this Atego specifically for the use in a war—not for me, who wanted to convert it. We had to chisel out a few bolts, and the real challenge was three bolts that took us 2.5 hours to remove. But we managed that too, and after disposing of the “scrap,” we were down to 5'290 kg.
The target weight was 5'000 kg, and there were still various items to remove and other tasks to complete before the subframe and cab could be installed.
In Phase 2, we removed the trailer hitch, side underrun protection, machine gun mount, third seat, etc. It was much easier without the flatbed. The rear underrun protection and side underrun protection were replaced with aluminum ones. I found what I was looking for at ALU-S.V.
Planing: Preliminary planning
Once it became clear that I my dream would come true, Clara and I started designing the interior. Alex from AluStar thereafter transferred the design for the walls into CAD, and the final design was sent to the company that would build the walls.
In order for the walls to be transferred to CAD, I had to decide which windows, doors, and hatches should be installed. There were two other reasons why I did this so early on. First, to see if I could stay within my budget, and second, because of the weight. 2'300 kg of available weight sounds like a lot, but that weight includes full diesel tanks, water tanks, and two people. At first, I was euphoric and had planned for two 300-liter diesel tanks and 200 liters of water. But that alone already amounts to nearly 900 kg, which would then not be available for the interior outfitting.
Over the course of these two weeks, there were various discussions regarding
- the windows, doors, and hatches (Outbound / Hühnerkopf / Dometic / Widebird),
- the thickness of the cabin walls,
- the height of the subframe,
- replacing the front steel bumper and various compressed air tanks with aluminum versions,
- etc.
And we hadn’t even gotten to the interior work yet.
The differences in weight are significant, and so are the costs… It’s always possible to make it cheaper and lighter, but is it possible to make it lighter without spending a fortune? We’ll see.
After further weight reduction, the light surface rust was removed. Using Owatrol, LIQUI MOLY MoS2 rust remover, and a wire brush attached to a cordless screwdriver, that was done in a few hours. For the next few weeks, there was nothing for me to do on the vehicle while the subframe and cab were being built.
It wasn’t until the subframe was attached to the cab that I was able to apply underbody protection to the frame.
Phase 2: Assembly of the new cabin
Then my walls arrived, and a week later, the Dometic S7P windows as well. Once the walls were up, I unpacked the first window and was ready to get started. Unfortunately, the holes for my S7P windows had been cut using the CAD template for S4 windows, so the corner curves were wrong.
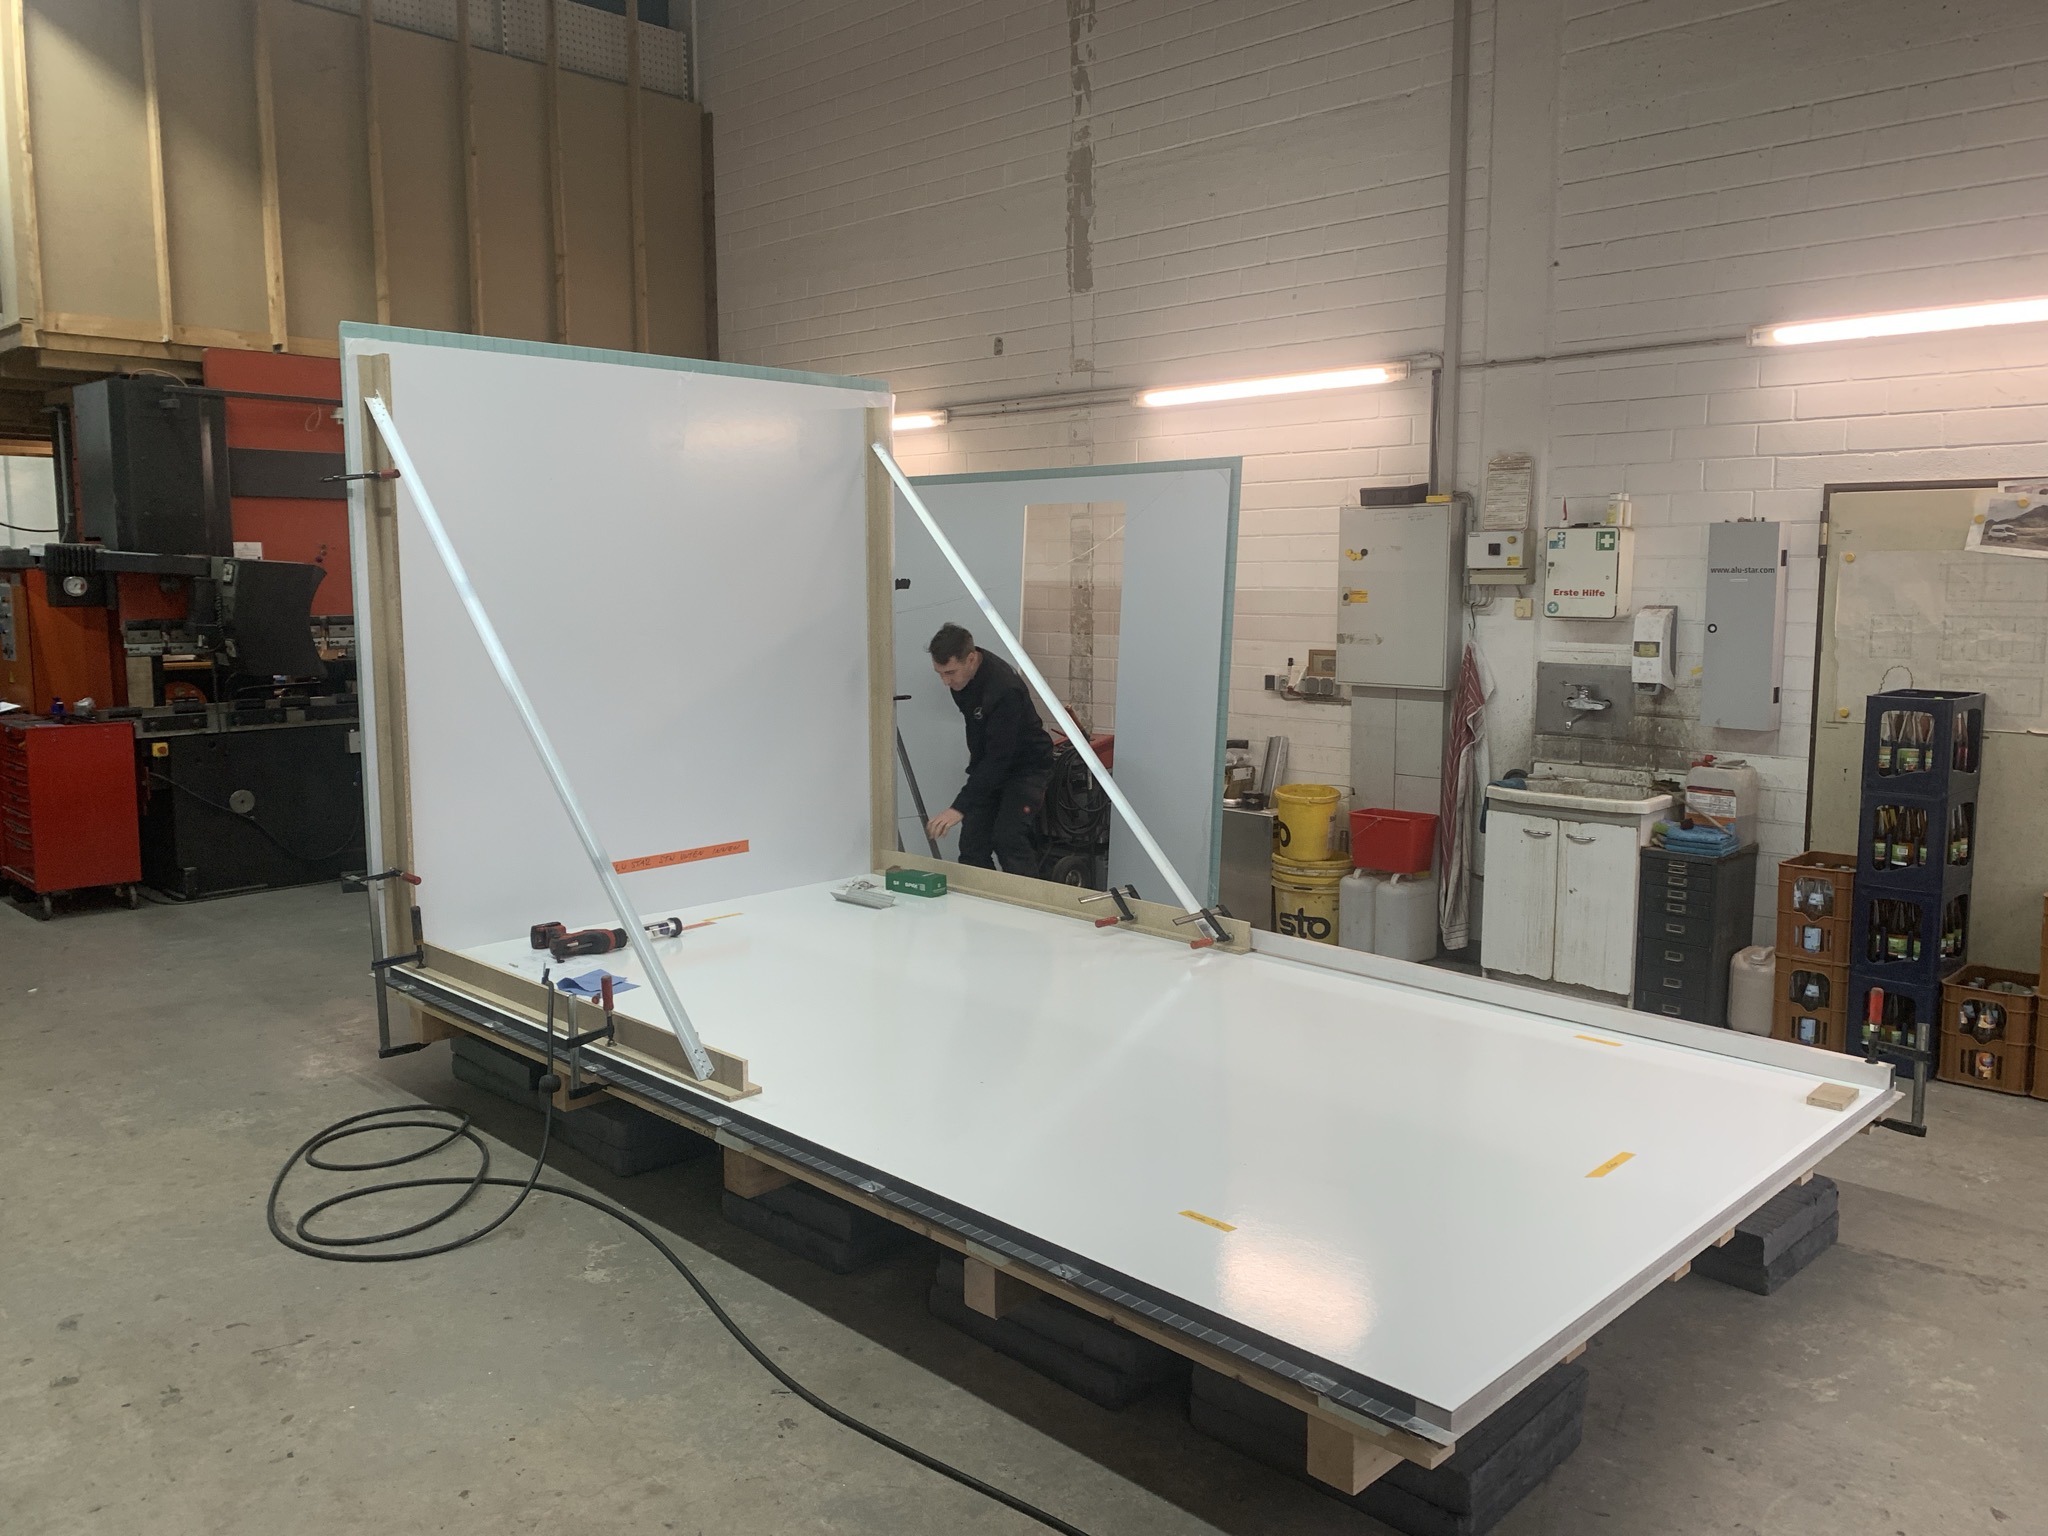
After a few discussions, we found an alternative. I got larger Dometic PUR-Win S10 windows, and AluStar adjusted the holes accordingly. This delayed the project by 2–3 weeks.
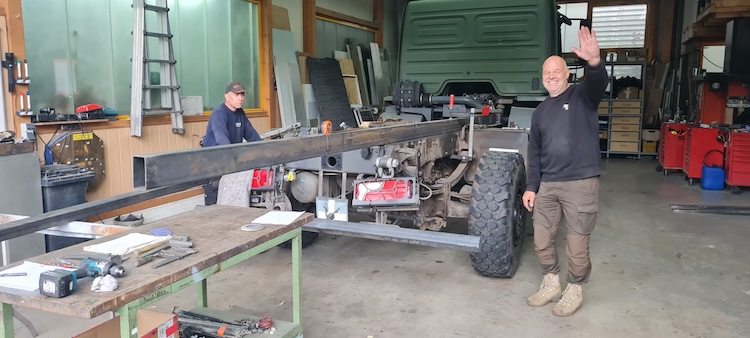
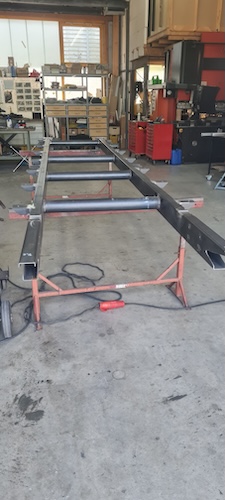
During this time, the subframe was measured, the plans were finalized, the positions of the stairs and the wastewater tank were determined, and the original spare tire mount was modified. In the meantime, the rear and side UFS had been delivered by ALU-S.V.
The Dometic PUR-Win S10 windows arrived quickly and actually fit. Only the installation turned out to be more difficult than expected. The instructions for installing them on a 43-mm-thick wall were clearly explained, but once again, it just didn’t work out. I had calculated that the required height of the spacer strips, relative to the wall thickness, was 21 mm, and I was supposed to use 3.9 × 40 mm screws.
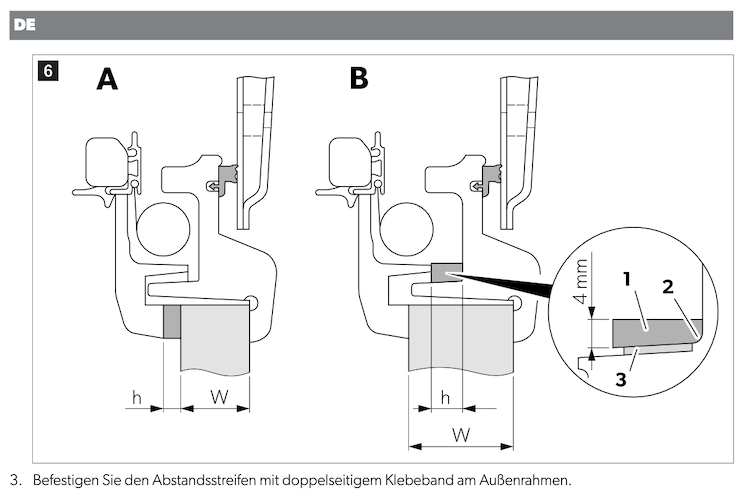
I have no idea who came up with that idea, but after 3 hours and a broken window, we gave up. On the second day, we installed the windows without spacer strips, using 45 mm screws and two 10 cm pieces of wire. We installed 3 windows in just under 1.5 hours.
Work on the Truck
While the subframe was being finished, I applied underbody protection. Since this is a topic on which experts have differing opinions, I eventually stopped listening to them and bought TECPO Bitumen underbody protection. I ended up using 8 x 500 ml cans.
Since the Atego had almost no rust, a 300-ml can of Owatrol rust inhibitor was all I needed.
At the same time, the trailer’s air pressure system, including the wiring harness, was removed (which weighed about 55 kg), and we decided to extend the Atego’s frame slightly toward the rear to prevent a kink point in the subframe.
The subframe was hot-dip galvanized, and the spare tire mount was sandblasted.
At the end of May, we estimated when all the work would be completed, and getting the vehicle off the registration at the end of June was the new goal.
I hadn’t included any of the vehicle work in my budget and had massively underestimated the costs 🤮 And even more work was done on the vehicle....
Installation of doors and hatches
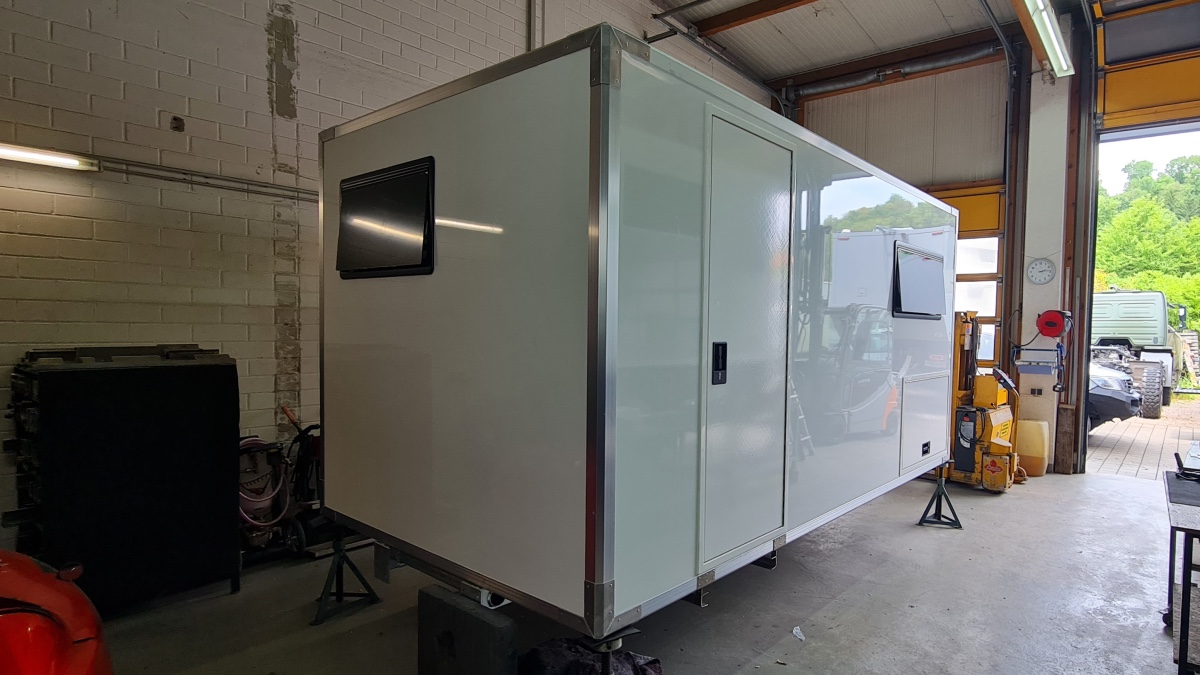
In June, after months of waiting, my Outbound door and hatches finally arrived. The hatches were the wrong ones, so I had to wait another 3 weeks. That’s how I had the time to properly learn the mounting of an Outbound door.
The hatches were much easier after that.
Planing: interior construction
Even though I still wasn't allowed to drive the Atego, we started planning the interior. I started with the topics that are most costly and in the end drive the weight of the truck
- Furniture (initially over 250 kg)
- Electrical system (approx 175 kg)
- Heating and water (approx 75 kg)
Furniture
Since I had no idea how long it would take to get the wood panels and aluminum profiles for my furniture, I started relatively early to estimate how much of each material I would need.
In May, I had roughly calculated the number of panels needed for the interior using CutOptima, and Clara had selected the colors. We planned to have Egger laminate the panels from epicPLY. The interior would be designed in Sage Green, Truffle Brown, and Gavi Stone Taupe.
epicPLY delivered the panels in just under two weeks; Egger took a little longer. The Matt local carpentry shop laminated the panels and also cut the countertop to size for me.
My first attempts at using the Item24 CAD program were a disaster, so I had to resort to Excel and paper to calculate the meters of 20x20 mm aluminum profile, angle brackets, and flat bars needed. And that wasn’t exactly a small amount. Based on the plan, I was then able to determine the number and size of the Euroboxes that would be used as drawers.
You shouldn’t work with Item24 if you don’t have time. Delivery times took forever. I ended up working with other manufacturers who produce Item24-compatible profiles. What can I say? It was faster and cheaper. The only downside was that the range of accessories was significantly more limited.
Which Heating system?
With the help of AluStar, the initial plans for the electrical system and heating began to take shape. The first thing that became clear was that I would get the Autoterm Air 2D 24V + monoBOIL from Tigerexped, including a 6-liter water tank. For me, it was the most flexible solution at the best price. The Truma Combi D 6 E would have been my second choice, but it was more than twice as expensive. I had also evaluated the Alde Compact 4000 D Plus, the Timberline 1 from Elwell, and the Wallas VIKING COMBI.
I actually wanted to order the Tigerexped Warm Shower Kit 2.0, but the monoBOIL electric water heater (6 L, 24 V, 600 W), combined with the Planar 2D, gave me more flexibility during installation. It took up less space in the RV, and I only lost the option to heat water using the heater.
Which Elektrical system?
The SÄK.EL was supposed to run without gas, so the electrical work took a while.
I would describe my system as follows:
- System voltage: 24 V DC, because the Atego has a 24 V onboard system
- Peak consumption covered: 5,000 Wh
- Storage capacity: 2 × 200 Ah × 24 V = 9,600 Wh gross | ~7,680 Wh usable (80% DoD)
- Solar charging capacity: 940 Wp: 2 × (AIKO Solar 470W Glass-Glass Black Frame AIKO-A-MAH54Dw Neostar 2P+)
- Charging via the Atego: 100 A per hour of driving via 2 MV Mac Plus 24/24-50 units and a 150 A alternator
After some time, I had narrowed down my options to three possible setups (and countless variations) based on my requirements: all-Victron, all-Mastervolt, or a mix of components to save money and weight. Then I stumbled upon MG Energy Systems, but like the all-Mastervolt option, that was outside my budget.
So I went with a Victron solution featuring 2 Mastervolt Mac Plus 24/24-50 units. Here’s what I ordered:
- Inverter/charger -> Victron MultiPlus-II 24/5000/120-50 230V
- MPPT charge controller -> Victron SmartSolar MPPT 150/45
- Batteries -> 2 x Victron LiFePO4 battery 25.6V/200Ah NG
- DC-DC charger to charge the service batteries via the starter battery -> 2 x MV Mac Plus 24/24-50
- 80 A Atego alternator replaced with -> 150 A alternator
- DC-DC charger for the 2V loads -> Victron Orion-TR Smart 24/12-30
- Lynx Smart BMS NG 500A monitoring system
- Victron Energy Cerbo GX monitoring system
- GX Touch 70 display screen
- Various fuse holders
- Various busbars / copper busbars
- 220 V distribution box incl. RCD/circuit breaker
- Cables, tons of cables
I could have saved on weight if I had chosen the Mastervolt components instead of the Victron MultiPlus-II 24/5000/120-50 230V and the Victron LiFePO4 battery 25.6V/200Ah NG. But that would have cost me a pretty penny.
The MultiPlus-II only works as a shore power charger in 220 V grids. For 110 V countries, I’d buy an MV EasyCharge Portable 4.3A if I needed it.
Why the large sine wave inverter? Because I wanted a double induction cooktop with a power consumption between 3,000 W and 3,500 W.
The second decision I had to make was about lighting. As usual, all they had to do was write “RV” or “expedition vehicle” on their brochure to jack up the prices. I opted for a Home Assistant solution based on Matter & Thread. The support from smattex on YouTube and over the phone helped me the most, and I began researching and planning. But in the end, the plan fell through because the Home Assistant controllers require a network, and I would have had to run an additional network router (like the Teltonika RUTM10), since I didn’t want to keep my Starlink running permanently.
So I went back to 12 V and 24 V lights and switches, did away with hallway circuits, and then came the never-ending story: which lights should go where. Tastes vary, and there are many beautiful 220 V lights, but the selection is smaller for 12 V and even smaller for 24 V.
Finally: Registered in Germany
In early July, the cabin was finally mounted on the Atego, and the final phase before the TÜV inspection began. The UFS (underride protection) had to be installed, the backup lights and license plate mount had to be attached, and, of course, the original wheel wells had to be put back on.
Since the trailer system (air and electrical) had been removed, I was getting an error message and needed a repair shop with staff who knew how to work on such old trucks. There were really only two Mercedes commercial vehicle repair shops in our area. Südstern-Bölle AG 👍 had the right staff, was flexible, and very customer-oriented.
Once the Atego was back at AluStar, all that was missing were the side and rear lights and the end plate from the Atego frame. And without those, there would be no TÜV inspection. I’d already been waiting three weeks for the plate. The original plate no longer fit because the frame extension was a few millimeters too big 🫣, and bending or cutting a 1-centimeter-thick steel plate wasn’t my thing.
Then came the weight measurement at the TÜV. The Atego, with the cabin and subframe, weighed in at 5,660 kg—significantly less than I’d expected. Just as I was thinking how wonderful life was, the TÜV informed that there was a problem with the AdBlue system and that I wouldn’t be able to get it registered—at least not that day.
The next day, Südstern checked for the error, couldn’t find it, and successfully issued a new ASU certificate. The TÜV accepted the new ASU certificate, and that hurdle was cleared as well. It seems to happen from time to time that old errors disappear or get overwritten in the onboard system after a while.
And after the Dog.O.Mobil came the SÄK.LE. In southern Baden and the Swiss Alemannic-speaking region, “SÄCKLE” or “SÄCKEL” refers to plastic bags, shopping bags, small cloth bags, or even a money pouch. The “Säckelmeister” was the person who managed the cash register or the money. As a verb, “SECKLE” means to move quickly, run, jog, or dash.
Then I spent another two hours in the air-conditioned registration office, and afterward I was allowed to drive the SÄK.LE 750 myself. It was July 30, 2026—six months after I had bought the Atego.
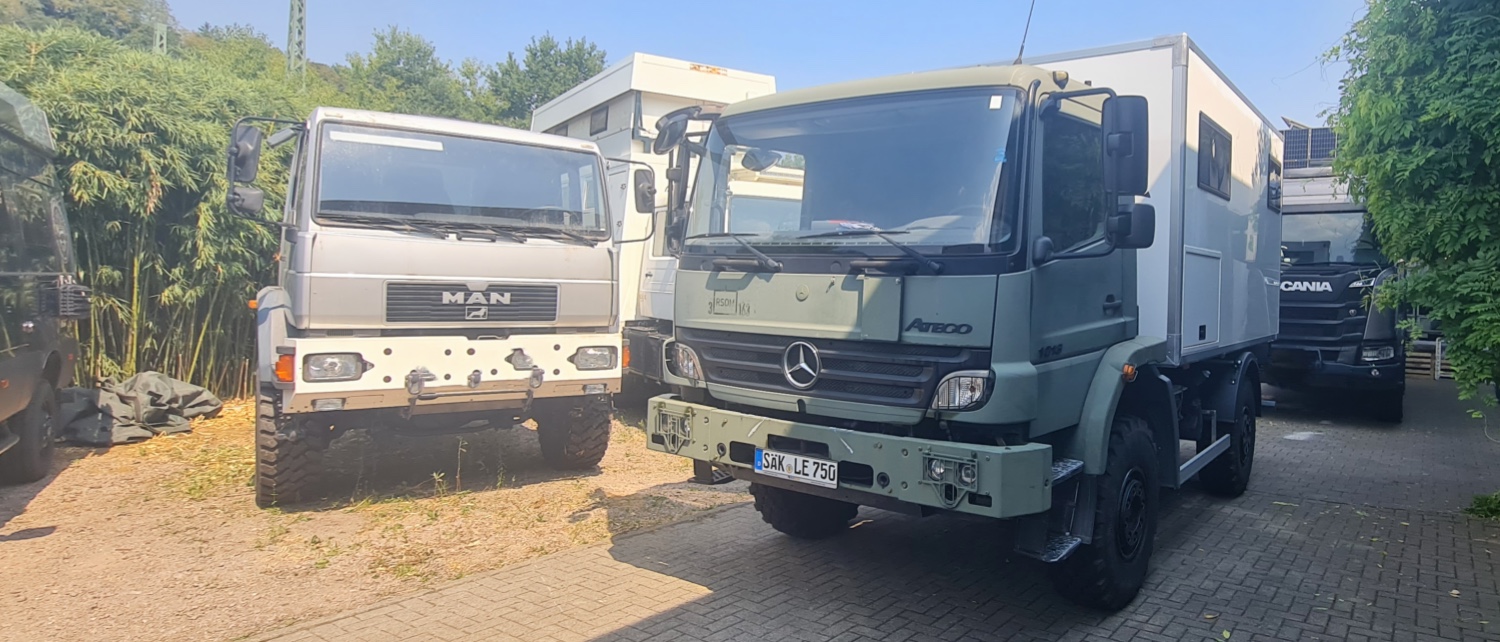
I'll have more to share about the interior work in teh coming months. I'm planning to register the truck as a RV in October and take it for a first test drive before the end of the year... we'll see.
Latest Articles

Finally Cartagena after 30'700 km
The drive north from Al Bosque Camping didn't go as I had imagined right from the start. I had had enough of dirt roads since NP Angel and wanted to spend my last few weeks on paved roads.

Closer to the end - South Colombia till Medellin
At the border between Ecuador and Colombia, in Puente Internacional de Rumichaca, I spent most of my time trying to find a parking space on the Ecuadorian side.

Ecuador - La Balsa to Tulcan
I crossed the border to Ecudor at La Balsa. Customs in Peru took 10 minutes, as did immigration in Ecuador. Adounas Ecuador then took almost 1.5 hours.

Lima to Ecuador
The Dog.O.Mobil was only a little dusty when I picked it up near the airport. Jose Luiz, the owner, had even sent me a video that weekend. He took his job seriously.